
Aislebound Modding
Ready to make your own custom products for Aislebound? Follow this guide to get started!
Prerequisites
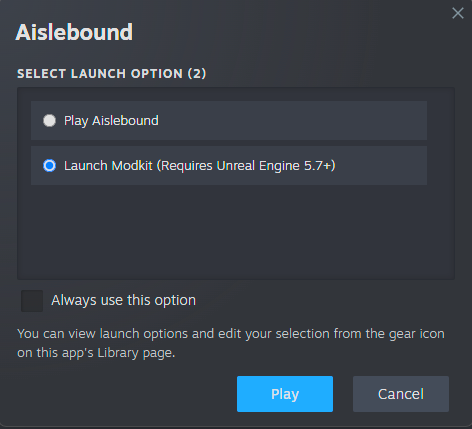
How to Access
The latest version of the Modkit is automatically included with your Aislebound installation as a launch option.
Components of a Product
For each product you will need:
- Static Mesh w/ Texture(s) and Material(s)
- Product icon image (.jpg/.png)
- Product Data Asset (Created with the toolkit)
Getting Started
The modkit will load into an Unreal project with a pre-made folder structure. The only directory you need to worry about it /Content/Mods. This is where project folders are stored. Each individual pack will have a separate folder.
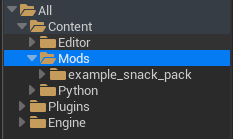
Create a new folder in the Mods folder. The name you give this folder will be your MOD ID. Within your mod folder, you will need each of these folders:
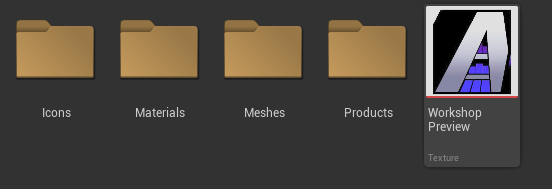
You should also import an image file and name it ‘WorkshopPreview’. This is the image your workshop listing will show.
Icons
This is where you will store your product icons. These are what will show in the in-game shop and product managers. Simply drag a supported image file in from Windows and it will automatically import as a Texture2D.
Meshes
Your product meshes will go here. Drag your 3d file in, configure it how you’d like, and import. Once imported, you should have a Static Mesh, at least one material, and at least one texture.
Materials
Move your texture and material files generated from your static mesh import here. Don’t worry; in Unreal, dragging into a different directory won’t break the references!
Products
Once you have everything else in place, this is where you will create your product data assets! Inside this folder, Right Click > Miscellaneus > Data Asset > PDA_ProductDefinition. Once the asset is created, double click on it to configure your product.

Building Your Product Data Asset
ProductID
VERY IMPORTANT! Aislebound uses a very specific product ID system. Please use this ID structure to ensure your mod works correctly: {ModID}:{ProductID} Your mod id must PERFECTLY match the name of the folder you made in the Mods folder. Everything after the colon is whatever you’d like to make this product’s ID (no spaces or special characters)
Short and Long Descriptions
These are just the display name for your product, with the short description being used in spaces where the full name would be too big.
Static Mesh
Select the mesh for this product. Ensure the proper material(s) and texture(s) are applied to this mesh before packaging.
Mesh Scale, Orientation & Offset
Product too big/small, facing the wrong direction, or clipping into the shelf? Use these to apply modifiers to your product’s mesh.
Case Qty
How many of your product come in a box.
Each Cost
The cost to buy one of your product. When ordering in-game, the cost per case will be Case Qty * Each Cost
Allowed Fixture Types
The types of displays that this product is allowed to be displayed on.
Category/Subcategory
These are used to improve searching/sorting efficiency in-game. Feel free to enter your own categories to seperate them or use the existing in-game categories to keep everything grouped nicely!
Demand Modifier
(Between 1-5) This is a scale of how high in demand your product is. Example: A highly popular item like milk would be a 5 while something like canned corn would be a 2 or 3.
Market Price
This is the suggested resale price. Selling above this in game will decrease chances of customers buying.
Icon
This is the suggested resale price. Selling above this in game will decrease chances of customers buying.
Case Mesh Override, Mod Source, Model Path, Product Width, Product Depth, Product Height
Can be ignored.
Packaging
Once you’ve completed these steps for each product you’d like to add, you are ready to package and distribute your mod!

Upon opening the ‘Prepare Mod for Packaging’ tab in the Modkit Hub, simply select your mod from the dropdown, and enter your mod name, author, and version. Clicking ‘Package & Upload to Workshop’ will package your mod for Steam Workshop, install SteamCMD from Valve* if there is not an installation present, and upload your mod to Steam Workshop as private. Once this process completes, your mod is created and posted on Workshop!!
At this time, there is no easy way to package and upload an update, without making a new upload and deleting the old one. This functionality should be coming with a later update.
*SteamCMD WILL prompt you to login to your Steam account with your username, password, and Steam Guard if applicable. This is a first-party Steam application and we have zero access to your Steam info. However, privacy concerns are understandable. You may also directly install SteamCMD from Valve beforehand and the modkit will use that installation.